Start today and get one month free.
First: What Excel can and can’t do
Microsoft Excel (and its simpler, online cousin Google Sheets) is adaptable. The better you know how to use it, the more you can get done. That being said, even if you’re good enough at Excel to compete internationally, there’s only so much you can do with it in a DIY bookkeeping context.
Single-entry bookkeeping in Excel
Before we get started on DIY bookkeeping, download our Income Statement Template. Later, you may prefer to use a different template, or even create your own. But when you’re getting started, our income statement template is tidy and approachable. And it has everything you need to get a grasp of single-entry bookkeeping in Excel.
Single-entry bookkeeping is a good choice if you run a small, simple business with a low volume of transactions. Every time money enters or leaves your business, it’s recorded once, as a positive (income) or negative (expense) value.
A quick heads up about double-entry bookkeeping. The double-entry method of bookkeeping is standard for larger, more complex businesses. It’s more effective than single-entry for tracking cash flow and protecting against errors and fraud. However, it’s also more work to maintain—and difficult to set up in Excel. If you’re at the point where you believe your business needs double-entry bookkeeping, it’s time to use accounting software. Or, think about hiring a bookkeeper (like Bench).
What you need to use the income statement template for DIY bookkeeping
Before you get started with Bench’s income statement template, make sure you understand the differences between single-entry and double-entry bookkeeping. You’ll also need access to spreadsheet software such as Excel or Google Sheets.
Understanding the income statement template
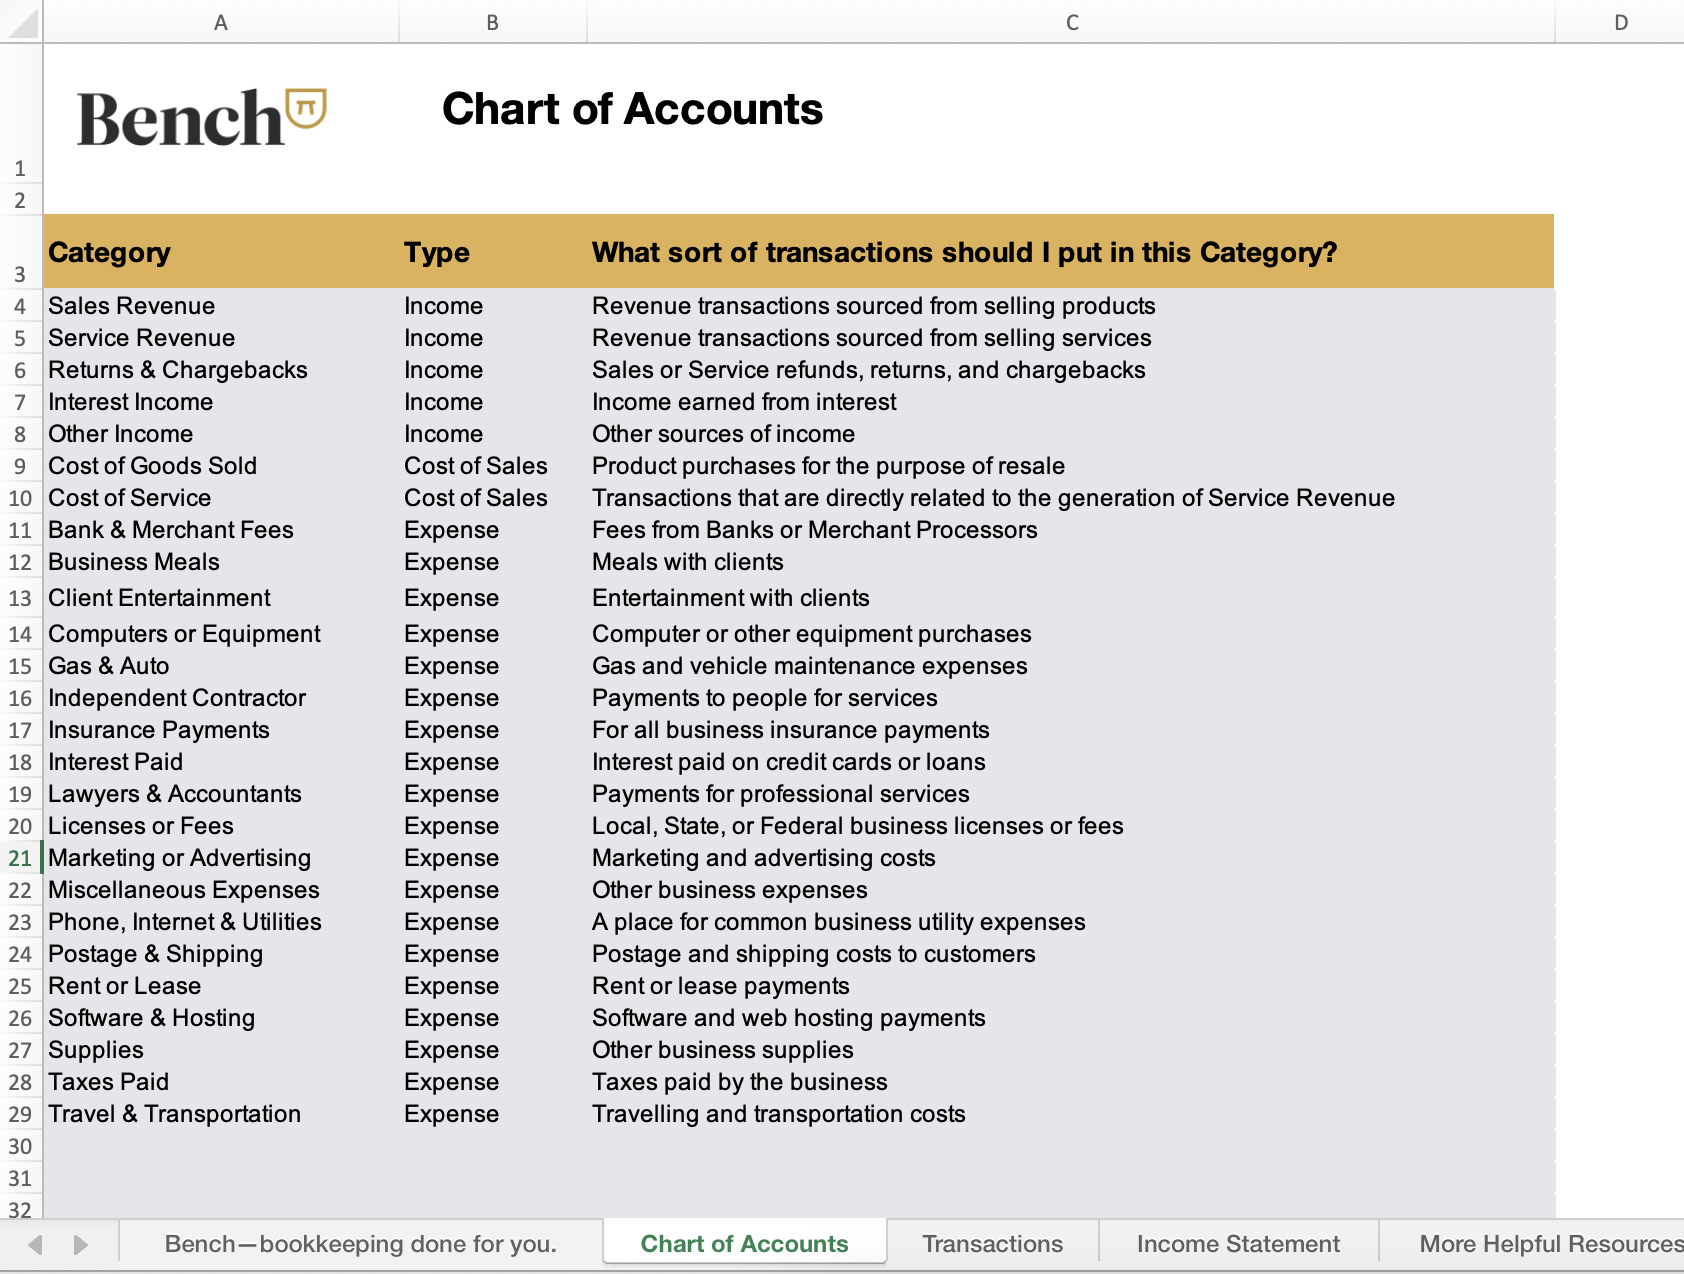
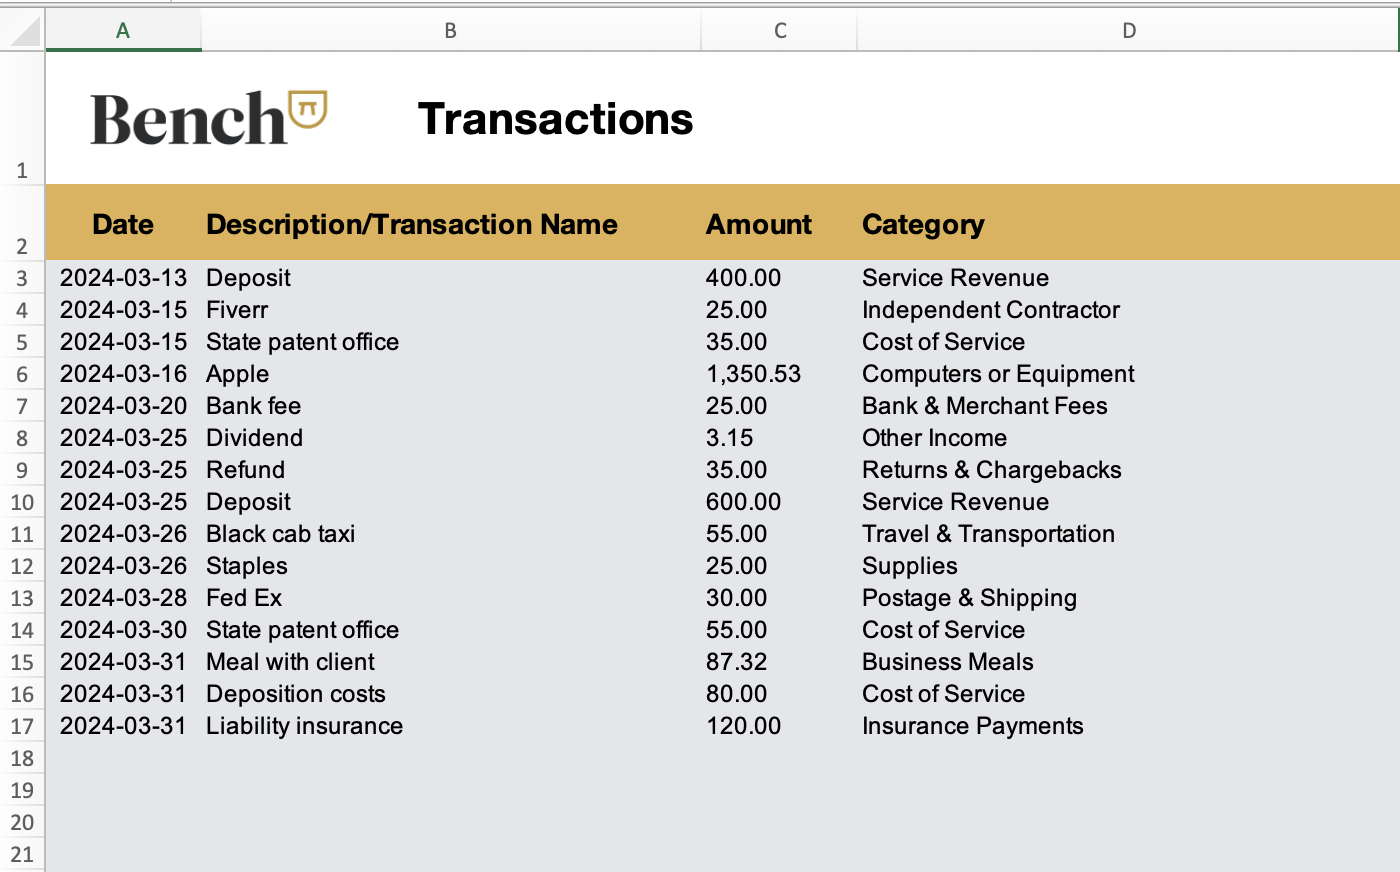
There are three sheets in Bench’s income statement template:
1. The Chart of Accounts
This lists all the accounts that make up your books. Think of each account a category. Every transaction you record gets sorted into one of these categories.
2. Transactions
This contains details of every business transaction you perform—the date, a description, the amount, and the account.
3. The Income Statement
This pulls info from your Transactions and performs some basic calculations. Then it summarizes how much income your business has earned and spent within a defined date range.
Are you currently doing your own books for your business?
Customizing the income statement template for your business
The info in the copy of the income statement template you downloaded is only there as a placeholder. Here’s how you adapt it to your business.
1. Add or remove accounts from the Chart of Accounts
The Chart of Accounts includes an account for “Gas & Auto.” But if you don’t drive for work, you don’t need this row—so you can delete it. The same follows for any other account that doesn’t apply to your business.
Likewise, if there are any transaction categories you need for your business that are missing from the Chart of Accounts, you should add them.
A note about account types:
- Income designates any account used to track money coming into your business.
- Expense designates any account used to track money leaving your business.
- Cost of Sale (COS) and Cost of Goods Sold (COGS) are unique. These accounts track the money you have to spend to create the product you sell your customers or clients. They’re often used interchangeably—COS by retailers, and COGS by manufacturers. Learn more about calculating these expenses.

2. Clear the Transactions sheet
Before you can start tracking your own transactions, you need to clear the placeholder data.
Select everything in the Date, Description/Transaction, Amount, and Category columns, and delete it. This tab is where you'll be entering your own transaction data each month.

3. Add or remove accounts from the income statement
By default, the income statement includes data for every account listed in the Chart of Accounts. If you’ve added or removed accounts from the Chart of Accounts, make the same changes to the income statement. For instance, if you don’t track “Gas & Auto” as an expense, delete the row.

4. Make copies of the income statement for each month
In order to generate monthly income statements, you’ll need separate sheets for each month. Make twelve copies of the original income statement, one for each month in the year.
Then, on each income statement sheet, change the Date Range (Beginning Date and End Date) to cover the relevant month. Name the sheet after the month it covers.

5. Optional—Add a sheet for tracking invoices
When you enter income from paid invoices into your Transactions sheet, include the invoice number in the description. That way, you can cross-reference it, and avoid errors—like forgetting to enter invoice payments, or entering the same invoice twice. This is a lot easier if you’ve got a separate sheet to track your invoices.
First, download a free invoice template for Excel, or get one for Google Sheets. Then, add a new sheet to your income statement template. Copy and paste the data from the invoice template you downloaded into the new sheet.
Keep the tab for your invoice tracker to the right of the Transactions sheet, but to the left of your monthly income statements. It’ll be easier to check for reference.
6. Optional—Add a sheet for projecting cash flow
Excel spreadsheets aren’t up to the task of creating a proper cash flow statement that you can present to investors. However, for your own personal planning, you can still plan your cash flow month by month in a simple spreadsheet.
To get started, check out our Google Sheets Cash Flow Projection Template. Copy and paste it into a blank sheet next to your Transactions.
Keeping your books up to date in Excel
Once you’ve customized the income statement template for your business, you’ll mostly be using the Transactions sheet.
Input and categorize transactions
Every time a transaction takes place—whether you’re moving money, cash, or credit—you need to enter it into the Transaction sheet, in its own row. Then you need to categorize it.
When you use Bench, your transactions are automatically imported and categorized for you. But for DIY bookkeeping in Excel, you’ll be doing it yourself.
- Get a record of the transaction. That could be a credit or bank card statement, info in your Paypal account, or receipt from a cash payment.
- Enter the date the transaction was recorded under the Date column, using DD/YY/MM format.
- Categorize the transaction. Enter its relevant account under the Category column. Be sure to type it exactly as it appears on the Chart of Accounts. The income statement will look at the data you enter in order to figure out how the transaction will be categorized.
- Add any notes for yourself in the Description/Transaction column.
Save income sheets
By the end of every month, the income sheet should have all the data it needs to summarize your bookkeeping for that period. Make sure to keep the income sheets separated, organized by month.
You may want to make a copy of each one at the end of the month, and either save it or upload it to the cloud. Come tax season, your accountant will need your income sheets for the year.
Advanced accounting in Excel
If you want to get beyond bookkeeping and start understanding your finances in deeper ways within Excel, we recommend starting with pivot tables.
Pivot tables allow you to visualize and summarize your accounting info.
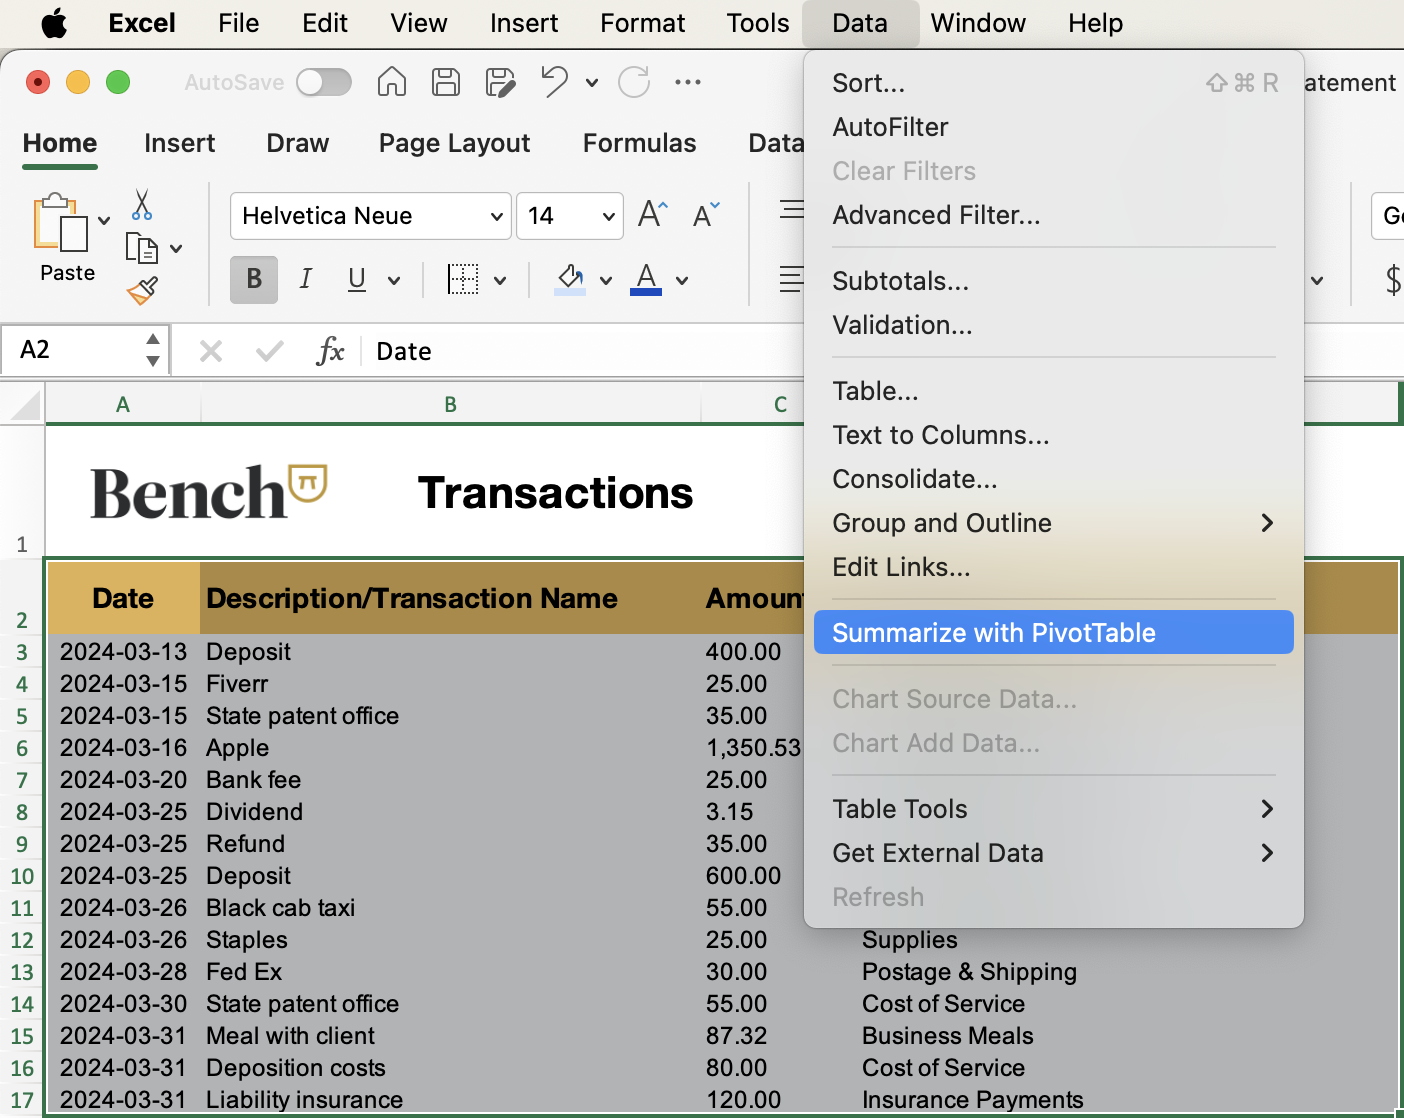
In our Income Statement template, we select Data > Summarize with Pivot Table

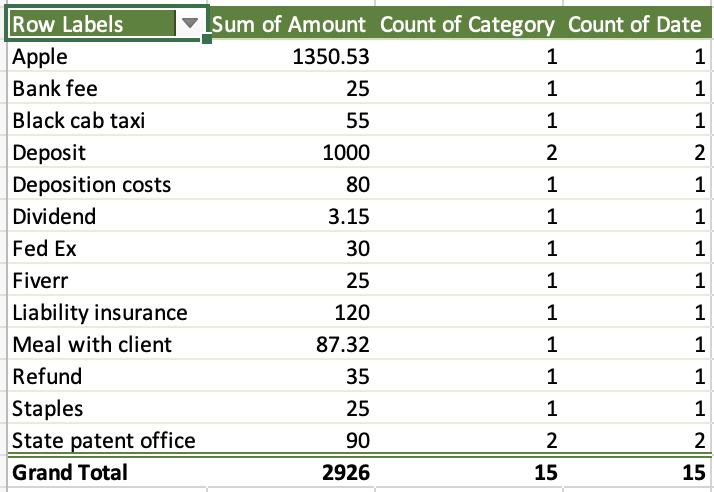
After we select all the categories we want to see summarized, here’s what we get.

This pivot table gives us a simple summary of how much we spent from each vendor and how often we bought from them.
There’s much more you can do with pivot tables. If you want to learn more, check out the Microsoft Office training page for pivot tables.
And if you just want some good old fashioned Excel tips to level up, check out this in-depth blog article from Hubspot.
Outgrowing DIY bookkeeping in Excel
If your business keeps growing, you’ll eventually need to move on from Excel.
Signs you’re ready for a bookkeeper:
- Data entry - Manually entering and categorizing transactions for your books is starting to take up too much of your time. (This can happen when you start processing more transactions per month)
- You decide to upgrade to double-entry bookkeeping
- You decide to switch to accrual accounting
- You need complex financial statements such as a Balance Sheet or Cash Flow Statement
- You start working with an accountant, and they need access to professionally kept books
- You’ve just experienced a hectic tax season, and realize you need to be better organized for next year
- You’ve experienced a phishing or malware attack on your business computer, and need a more secure way to maintain your business records
- You have bookkeeping questions that can’t be answered by searching online
Sound like you? Learn how to dump spreadsheets and outsource your bookkeeping.


